Arduino uno
ARDUINO UNO
ABSTRACT:
Arduino
is an open-source electronics platform based on easy-to-use hardware and
software. Arduino boards are able to read inputs - light on a sensor, a finger
on a button, or a Twitter message - and turn it into an output - activating a
motor, turning on an LED, publishing something online. You can tell your board
what to do by sending a set of instructions to the microcontroller on the board.
To do so you use the Arduino programming language (based on Wiring), and the
Arduino Software (IDE), based on Processing.
Over the years Arduino has been the brain of thousands of projects, from everyday objects to complex scientific instruments. A worldwide community of makers - students, hobbyists, artists, programmers, and professionals - has gathered around this open-source platform, their contributions have added up to an incredible amount of accessible knowledge that can be of great help to novices and experts alike.
Arduino was born at the Ivrea Interaction Design Institute as an easy tool for fast prototyping, aimed at students without a background in electronics and programming. As soon as it reached a wider community, the Arduino board started changing to adapt to new needs and challenges, differentiating its offer from simple 8-bit boards to products for IoT applications, wearable, 3D printing, and embedded environments. All Arduino boards are completely open-source, empowering users to build them independently and eventually adapt them to their particular needs. The software, too, is open-source, and it is growing through the contributions of users worldwide.


 History
Pin diagram:
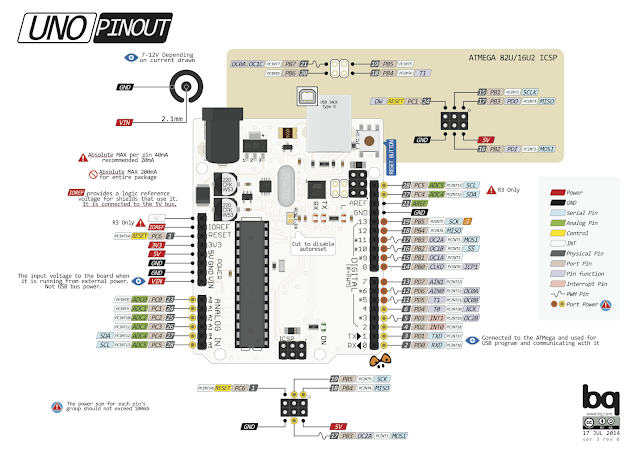
Arduino
Uno consists of 14 digital input/output pins (of which 6 can be used as PWM
outputs), 6 analog inputs, a 16 MHz crystal oscillator, a USB connection, a
power jack, an ICSP header, and a reset button
Power Jack: Arduino can be power either from the pc through a USB or through external source like adaptor or a battery. It can operate on a external supply of 7 to 12V. Power can be applied externally through the pin Vin or by giving voltage reference through the IORef pin.
Digital Inputs: It consists of 14 digital inputs/output pins, each of which provide or take up 40mA current. Some of them have special functions like pins 0 and 1, which act as Rx and Tx respectively , for serial communication, pins 2 and 3-which are external interrupts, pins 3,5,6,9,11 which provides pwm output and pin 13 where LED is connected.
Analog inputs: It has 6 analog input/output pins, each providing a resolution of 10 bits.
ARef: It provides reference to the analog inputs
Reset: It resets the microcontroller when low.
Program Arduino:

5 Steps to program an Arduino
Programs written in Arduino are known as sketches. A basic sketch consists of 3 parts
1. Declaration of Variables
2. Initialization: It is written in the setup () function.
3. Control code: It is written in the loop () function.
The sketch is saved with .ino extension. Any operations like verifying, opening a sketch, saving a sketch can be done using the buttons on the toolbar or using the tool menu. The sketch should be stored in the sketchbook directory. Chose the proper board from the tools menu and the serial port numbers. Click on the upload button or chose upload from the tools menu. Thus the code is uploaded by the bootloader onto the microcontroller.
Few of basic Adruino functions:
digitalRead(pin): Reads the digital value at the given pin. digitalWrite(pin, value): Writes the digital value to the given pin. pinMode(pin, mode): Sets the pin to input or output mode. analogRead(pin): Reads and returns the value.
analogWrite(pin, value): Writes the value to that pin. serial.begin(baud rate): Sets the beginning of serial communication by setting the bit rate.
7 Reasons why Arduino is being preferred these days
1. It is inexpensive
2. It comes with an open source hardware feature which enables reference source.
3. The Arduino software is compatible with all types of operating systems like Windows, Linux, and Macintosh etc.
4. It also comes with open source software feature which enables experienced software developers to use the Arduino code to merge with the existing programming language libraries and can be extended and modified.
5. It is easy to use for beginners.
6. We can develop an Arduino based project which can be completely stand alone or projects which involve direct communication with the software loaded in the computer.
7. It comes with an easy provision of connecting with the CPU of the computer using serial communication over USB as it contains built in power and reset circuitry.


Comments
Post a Comment